Showing posts with label recipes. Show all posts

Monday, 28 October 2013

Dairy free cheesy mushroom baked rice

 We got our first snowfall of the season here, This is my mind calls for oven roasted meals. I wanted to make something that was filling and savory and rice based. I came up with this recipe and it seemed to fit the bill of what I was looking for.


Dairy Free Cheesy rice
1/3 cup nutrtional yeast
3tbsp onion flake
1/2 tbsp garlic powder
1 tsp each of pepper, salt,and  mustard powder
2.5 c  sliced mushrooms
3/4 cup shredded daiya chedder
3 cup cooked rice
1 cup soy milk
2 tbsp coconut oil


Mix first 6 ingredients together in a bowl,
Put into a greased casserole dish
Pour soy milk over it all and dot coconut oil over top
Bake covered at 400F until hot and done (About 40 minutes)

Monday, 19 August 2013

Roasted garlic pepper white wine creamy pasta

I love summer for all the great fresh vegetables that my garden provides me with.  This year our peas have done particularly well, I was looking to create a dish that utilized my over ripe peas. With a little inspiration from other moms on a Facebook group this dish was created. I love the how creamy it is, it almost reminds me of a dairy free alfredo sauce.


Roasted Garlic and Pepper White wine Pasta
Serves 6

1 yellow pepper halved
1 White onion cut in half
9 cloves of garlic
Olive oil
Coarse ground black pepper

Preheat oven to 400F
Pour a good dollop of olive oil in a glass pan and place vegetables in in. Drizzle more olive oil over top and sprinkle with pepper.
Roast for at least 45 minutes, 1 hour is better.

.304 kg sliced chicken breast
2 cups Spinach
1 cup Fresh Peas
1/3 cup All purpose flour (Can sub GF flour)
1 cup Soy milk
1/2 tsp Salt
1 tsp black Pepper
1/2 cup Daiya mozzarella shreds
1/4 cup Coconut oil
1 tbsp Dried basil
1/2 cup White wine
1 cup Poultry broth

Prepared linguine

Separate garlic from roasted veggies, mash
Slice the rest of the roasted vegetables into strips.
Toss sliced chicken in basil, salt, black pepper and mashed garlic
Pour about a tablespoon olive oil into a pan on medium heat. Fry sliced chicken until done. Remove from pan. Pour in half of the white wine, scraping the bottom of the pan all the while.
Turn off burner or turn to low stir in Coconut oil and flour making a roux and cook for 2 minutes, Do not let it brown.
After two minutes turn burn back to medium low heat and whisk in chicken broth, milk and rest of white wine. Whisk until smooth then stir scraping bottom frequently until it starts to thicken
Whisk in Daiya cheese,
Bring to a simmer
Stir in peas, turn to low and cook for 6 minutes, stirring often
Mix in chicken, sliced vegetables, spinach, stir until spinach is wilted and everything is hot and bubbling.

Serve over linguine


Monday, 8 April 2013

Puffed Brown Rice chocolate squares

When Orion was really little we used to give him  organic puffed brown rice to snack on, or to let him feel like he was included in the meal. I still have multiple bags in my pantry, I was struggling to find something to do with them and thought of how much I used to love puffed wheat squares. Now the original version would not work with our allergies and the fact that I have an aversion to corn syrup. I had to laugh at all the versions I found that labeled them as healthy when they contain cups upon cups of sugar. My recipe is by no means healthy but it isn't made with refined sugars so I consider it ok in moderation. This would be really tasty with coconut stirred in but my husband hates coconut and would be very disappointed if he couldn't eat these.


1/2 cup palm shortening (You could sub coconut oil here if you would like)
1/2 cup honey
1/2 cup Palm sugar
1/3 plus 2 tbsp unsweetened cocoa powder

8 cups organic puffed brown rice
1/4 cup chia seeds

Line a 9x 13 pan with wax paper
In a medium sauce pan, on medium heat melt shortening and honey together, mix in palm sugar and cocoa powder until a smooth consistency is reached.
In a extra large greased bowl mix brown rice puffs and chia seeds, Pour chocolate sauce over it all and mix until it is all evenly coated.
Firmly press mixture into your pan refrigerate for 30 minutes. Pop out of pan and cut into desired pieces

Saturday, 23 March 2013

Oatmeal Raisin cookies

Spring is finally starting to show itself here. We played outside until our hands were too cold and we had to retreat back inside, Orions choice of snack lately has been cookies. I decided instead of denying him cookies yet again, we would bake some together. I found a great recipe  on Whole Grain Gourmet  and adapted it to suit our allergies and needs. It was already dairy free, so all I had to do was adapting it to be egg free. It is refined sugar free but does contain quite a bit of honey. Next time I make it I may experiment on cutting down the amount of honey.


Here is my version:
Original recipe here at Whole Grain Gourmet


Oatmeal Cookies (with Honey)

Ingredients:

Dry ingredients:
1 cup whole wheat flour (a pinch more depending on the moisture of the mix)
1 1/2 cups of old fashioned rolled oats (quick cooking is ok too- do not use instant)
1/2 teaspoon baking soda
1/2 teaspoon baking powder
1/2 teaspoon salt
2 teaspoons Epicure selections Gingerbread spice

Wet ingredients:
1/2 cup honey
1/4 cup oil
1/4 cup unsweetened applesauce
1 tablespoon full flavor molasses
1 flax egg (Mis 1 Tbsp ground flax with 3 tbp hot water, whisk and let sit until gooey)
2 teaspoons vanilla extract


1/2 cup raisins
1/4 cup hemp hearts
1/4 cup chia seeds

Preparation:
In a medium bowl, mix all the dry ingredients together.
Add the wet ingredients to seperate bowl and mix together.
Mix the dry ingredients into the wet ingredients. 
Add the raisins, hemp hearts and seeds. 
Cool the mix for 30 minutes in the refrigerator.
Preheat the oven to 335 degrees
Drop by rounded teaspoonfuls onto a baking sheet. Cookies will not spread.
Press down with a fork to ensure even cooking.
Bake for about 10-12 minutes or until golden on the bottom of the cookie. (10 minutes for soft and 12 for slightly crispy around the edges)
Cool on pan for 5 minutes, remove from pan and finish cooling on a wire rack. 


Friday, 8 March 2013

Crockpot Chipotle bacon baked beans

I really enjoy using my slow cooker for anything involving beans, for some reason if I cook them on the stove I always seem to burn them. I haven't ever tried cooking baked beans in the oven since I don't own a dutch oven. As always these are dairy free, egg free, soy free,  nut and sesame free. They also happen to be gluten free. My husband is in love with these beans, he says he will never go back to eating canned beans again :)


Chipotle Bacon baked beans

3cups dried white beans (I buy my beans at the market and they aren't labeled but I am almost certain that they are great northern beans)
2 cup bacon chopped fine (I used bacon ends that I buy by the case and sent it through my food grinder)
1 onion minced
5 cloves garlic minced
1/2 cup maple syrup
1/4 cup black strap molasses
2 tbsp Dijon mustard
1 400 ml can of tomato sauce
1/2 tsp baking soda
1 cup boiling water
1/3 cup palm sugar
1 tsp Chipotle chili powder


Soak beans in ample water and 1 tsp of baking soda overnight
In the morning boil beans with ample fresh water for 10 minutes
Drain and rinse
Put the rest of ingredients in crockpot  and mix well
Cook on high for 4-6 hours stirring periodically, until beans are cooked.
Serve with bread, biscuits or corn bread.


Delicious biscuits I made, I will post the recipe another day


Wednesday, 23 January 2013

Blueberry raspberry mini muffins

 I've got a thing for muffins, they are a delicious comfort food. After a night up with a cranky toddler I decided to make some muffins. I strongly dislike overly sugary muffins that leave you with a sugar high after eating them. With Orions allergies I have to make sure these are dairy and egg free as usual, I find it is helpful to look for vegan recipes. As usual I can never find a recipe that I like so I altered one to suit my purposes. I can't ever decide which type of berries to use, so I used them both! Mini muffins are perfect for portion control and for toddler hands. My toddler has such a short attention span, I was forever finding full size muffins with one bite taken stashed in creative places. FYI a stale month old muffin can double as a cat toy at the most inopportune moments. Enjoy these we certainly did :)


Original unaltered recipe here at egglesscooking.com


1/4 cup Ground Flaxseed
3 tbsp hemp hearts
1 and 3/4 cups Whole Wheat Pastry Flour
1 and 1/2 teaspoons  Alumininum free Baking Soda
1/2 teaspoon Cinnamon
1/2 teasspoon epicure gingerbread spice
1/4 teaspoon  salt
1 cup Coconut Milk
1 tablespoon Apple Cider Vinegar
1/4 cupVegetable Oil
1/4 cup Maple Syrup
1/4 cup Local Honey
1 teaspoon Vanilla Extract
1  cup Blueberries (fresh or frozen)
1/2 cup raspberries


Preheat oven to 375F/190C for 15 minutes. Line a muffin tin with paper liners and grease it well with non stick cooking spray.
Mix together the  milk and vinegar; set aside.
In a large bowl combine together the ground flax seed, hemp hearts, flour, baking soda, cinnamon, gingerbread spice and salt.
In a medium bowl, whisk together the maple syrup, oil, milk mixture, vanilla extract and orange zest.
Make a well in the dry ingredients and stir in the wet ingredients with a rubber spatula until just moistened. Fold in blueberries and raspberries
Scoop into mini muffin pan, fill each cup 2/3 full.
Bake for 12 minutes


Wednesday, 9 January 2013

Lemon dill shrimp with green beans

Sometimes you have a night that you just really don't feel like cooking, or you get home late and don't have much time. In these cases it is nice to have an easy meal to fall back on, everything in this meal is something from the pantry or freezer. If I am in a big hurry I will make brown basmati rice or sprouted brown rice. Tonight I wasn't in a huge hurry so I made Calrose brown rice. This recipe is dairy less, casein free, gluten free, egg free. It contains no soy or peanuts. We are lemon lovers in our house, I have included a less lemony version.


2.5 cups chicken broth
1/2 cup lemon juice + 1 tbsp (For the less lemony version only use 1/4 cup lemon juice)
3 tbs lemon dilly dip mix (Epicure)
4 cloves garlic minced
1/2 tsp fresh ground pepper
1 tbsp coconut or other high heat stable oil
2 cups cooked shrimp
 3 tbsp corn starch (For the less lemony version only use 2.5 tbsp of corn starch)
2.5 cups Frozen green beans (I used mixed green and yellow beans since that's what I had in the freezer)

Thaw shrimp, toss shrimp in tbsp lemon dilly, 1 tbsp lemon juice pepper, pepper and garlic, set aside.
Whisk together lemon juice, chicken broth and and remaining  dip mix, reserve 1/4 cup liquid and whisk in corn starch.
On medium high heat sautee shrimp 2 minute in the coconut oil , take out of pan and set aside.
Pour first broth mixture in pan scraping pan bottom well,  add beans bring to boil, then lower to a simmer covered for 3 minutes. Whisk in reserved broth (You may need to give it a little stir before you pour it in), making sure you are stirring constantly, mixture should thicken nicely.
When mixture is thickened put your shrimp back in stir well and simmer for 2 minutes.
Serve over rice


Thursday, 3 January 2013

Vegan fudgey brownies

This is the first baking recipe I have ever created from scratch. I originally wasn't going to make up my own recipe for brownies but I couldn't find a recipe that had all the elements I wanted in it, so I made up my own. It isn't a huge sugar overload but still will satisfy your cravings for fudgey brownies. This recipe makes 20 brownies.


2 cups Whole wheat pastry flour
1 tsp baking powder
3/4 cup Sugar (I used white sugar for this one)
1 cup Cocoa

1 small mashed over ripe banana (I always keep some in my freezer)
1/2 cup apple sauce
1/4 cup coconut oil
2 tsp vanilla extract
3/4 strong brewed coffee
1/2 cup soy milk (Or any other dairy free milk)

1/3 cup vegan chocolate chips + 1 tsp coconut oil
1/4 cup Hemp hearts


 Preheat oven to 350F
In a large bowl mix the dry ingredients together making sure to break up any clumps
In a smaller bowl blend the dry ingredients until a uniform texture in reached.
Make a small well in your dry ingredients and stir in your wet, mix until there are no large clumps and batter is smooth, it will be really thick. Spread in a greased 8x8 pan and bake for 30 minutes.

Melt the chocolate chips and coconut oil in the microwave (Don't burn it like I did the first time)

Spread over baked brownies and sprinkle hemp hearts,
Cool cut and serve

Wednesday, 2 January 2013

Dairy free left over turkey enchiladas

I look forward to this season every year for the leftovers. I love turkey, there are so many ways to use it.We had no left over turkey from Christmas celebrations with my family this year. I decided I would bake a turkey for New years day. I made a simple turkey dinner and have tons of left overs. I already made two batches of stock from the carcass, I will be canning the broth tomorrow and we will be having soup. Today I wanted to make enchiladas, they seem fairly labour intensive but it is more time then effort. Almost every enchilada recipe I have seen includes copious amounts of dairy. My recipe is gluten free, dairy free/ casein free, egg free, sesame free, nut free and soy free. If you prefer to not use fresh tomatoes you can use drained canned tomatoes. This makes a HUGE recipe, enough for two meals for the three of us, After I cooked it I froze half to thaw for a quick meal at a later date. This isn't too spicy so it is a toddler friendly meal :)


Sauce:
11 small to medium size cored and halved tomatoes (If you are using a variety of tomatoes that isn't very watery like paste you don't need to core unless you dislike seeds)
10 pickled jalapenos slices (I found this great little jar at superstore)
5 garlic cloves 
1 red onion quartered
1 400 ml cans of pure tomato sauce
1 tsp chili powder
1/4 cup nutritional yeast
1/2 tsp salt
1/2  cup mild salsa


Filling:
2 cups finely chopped Left over turkey (I used a mix of white and dark) (You really could use almost any meat here)
3 cups Mild salsa (I used frozen salsa (Whenever I make a fresh salsa I freeze the leftovers, mine has corn, peppers, onions, cilantro) 
1\4 cup nutritional yeast
(If you have really runny salsa add 2 tbsp of cornstarch)


 12 corn tortillas


Make Sauce
In a large pot put your tomatoes, onion, garlic and jalapeno on medium heat, 
Bring to to a boil, boil for 10 minute, mash tomatoes coarsely 
Turn heat down to a simmer and simmer with lid on for 1 hour, stirring occasionally, take lid off and cook for another hour, Puree,
Then add chili powder,  canned tomato sauce, nutritional yeast and  canned sauce, Simmer for 15 minutes

Make filling
Put everything in a pot and bring to a boil, then turn heat down and simmer for 5 minutes stirring often.

To assemble Enchiladas, 
 Preheat oven to 375F
Heat tortillas single layer on a baking sheet in the oven until just pliable (About 3 minutes) Cover the bottom of a 9x13 pan with sauce.
Dip each tortilla in sauce place in baking pan, put about 1/4 cup of filling in the middle, roll up, continue until finished.
Cover pan with foil and bake for 15 minutes, remove foil  turn up the heat to 400 and bake for another 10 minutes
Let sit about 5 minutes before serving

Wednesday, 26 December 2012

Vegan Chickpea curry


It has been a busy December this year! I went into it with all the intentions of continuing to post every week. Then some of my recipes flopped, I didn't have the time nor the inclination to make them over to figure out what went wrong, though I do have some suspicions. We celebrated Orion's second birthday early in the month with extended family we see about once a year. We were lucky enough to be graced by the presence of the "Yuletide Flu" which ate up a little over a week of our month. Then preparations for Yule took over, 4 days later it was Christmas. Now it is Boxing day and we can settle back into our normal routine. We have had an overdose on all things white and refined this season, too much white flour, white sugar, white rice and too many treats for all of us (Too many "Fruit" snacks for Orion and too much dairy containing chocolate for me)  The inspiratation for this meal comes from my book club book, "The secret daughter" While it makes me cry regularly as I'm reading it, it also leaves me with a longing for curry, specifically vegetarian curry. So I got up last night at midnight to dig dried chickpeas out of the cold room to soak for today. I have taken my recipe for butter chicken and changed it bit to make a chickpea curry. If you are used to traditional Indian food this is by no means the recipe for you. If you just want something tasty that has curry flavour, yet is mild enough for kids you have found the right recipe. Enjoy!


2.5 cups dried chickpeas (Soaked over night)
1 onion diced
8 garlic cloves, minced
4 Tbsp coconut oil
4 tsp ground cardamom
6 tsp mild curry powder
6 tsp garam masala
1 tsp ground ginger
2.5 cup coconut milk (I use coconut dream, if you use a canned milk leave out the cornstarch)
2 Tbsp corn starch (Feel free to substitute for any other type of thickening starch)
1 small can tomato paste


3 cups chopped fresh Baby spinach
2 Tbsp lemon juice
1 cup plain Coconut milk yogurt plus 1 tbsp lemon juice (So nice makes a great one) (Reserve for just before serving)


Turn crockpot on high, put Chickpeas in, cover with coconut oil.
In a measuring cup whisk together, coconut milk, tomato paste, lemon juice and corn starch and spices. Pour over everything. Cook on high for 2-3 hours then turn down to low for another 4 or so, Stir occasionally.


15 minutes before serving stir in yogurt, lemon juice and spinach. Serve over rice with fresh Naan (I used this recipe and it was great!  I made it with 100% whole wheat pastry flour) on the side

Monday, 3 December 2012

Dairy free Butter Chicken

Sometimes I just get a craving for something that will not be satisfied until I make it. This time around it was butter chicken, Clay hates curry so I have to pick and choose which ones I make. He actually ate this one without complaining. Orion gobbled his up. I searched and searched for a dairy free butter chicken recipe. The ones I found just seemed to leave ingredients out instead of substituting them, so I found a normal recipe that got rave reviews and substituted items to make it allergen friendly.


Here is the original recipe at "Crockpot 365"


Here is my allergen friendly version:


2 chicken breasts with backs attached, deboned and diced (You could use other chicken this is just what I had in the freezer)
1 onion diced
8 garlic cloves, minced
4 Tbsp coconut oil
1 1/2 tsp ground cardamom
2 tsp mild curry powder
2 tsp garam masala (I only trust Mcormick brand)
1/2 tsp ground ginger
1 3/4 cup coconut milk (I use coconut dream, if you use a canned milk leave out the cornstarch)
1 Tbsp corn starch (Feel free to substitute for any other type of thickening starch)
1 small can tomato paste
2 T lemon juice
1 cup plain Coconut milk yogurt plus 1 tbsp lemon juice (So nice makes a great one) (Reserve for just before serving)


Turn crockpot on high, melt coconut oil in bottom.
Place garlic and onion in bottom of Crockpot.
Debone and dice chicken. Place in Crockpot.
Mix spices together and sprinkle over chicken stirring to coat evenly.
In a measuring cup whisk together, coconut milk, tomato paste, lemon juice and corn starch. Pour over everything. Cook on high for 4 hours or low for 8. Stir occasionally.
15 minutes before serving stir in yogurt and lemon juice. Serve over rice

Sunday, 25 November 2012

Roasted garlic and red pepper hummus

It is Grey cup Sunday here in Canada. While I'm not much of a football fan I do love using it as a excuse to spend time with family and eat appetizers for dinner. Every year my mom asks me to make hummus, for some reason hers never turns out like mine. With her kids grown and flown the coop my moms food processor gets little use these days except for making hummus. Since she prefers my hummus she has passed on the food processor and the hummus making duty to me. I find that the key to a good hummus is using good beans. I have never had good hummus from no name brand beans. I will ONLY buy Scarpone canned beans. I have tried cooking the garbanzo beans myself and they just leave something lacking. Since Orion has a sesame allergy I substitute sunflower butter instead, you could leave it out but I find it lacks something in flavour without it. This year I am switching it up a little and making red pepper hummus.

Roasted Garlic and red pepper Hummus
1 medium pepper cut in half
1 head garlic peeled
Scant 2/3 cup lemon juice
2 little cans  (Just under 600ml total)Scarpone Garbanzo beans drained with 4 tbsp of liquid reserved
1/4 cup Sunflower butter (If you run the measuring cup under hot water before measuring the sunflower butter it will slide out easily)
1/4 cup EVOO
1 tsp Himalayan salt
1 tsp Black Pepper
Paprika to garnish if you would like

Preheat oven to 400F
Take pepper halves and spray with Olive oil, Wrap head of garlic in foil. Bake in oven for 1 hour. Let cool.
Put beans, liquid, peppers and garlic in food processor and process until chopped,  Dump in Sunflower butter, lemon juice, blend again. while food processor is going drizzle in olive oil. Taste, then add salt and pepper (Some beans are saltier then others) (I find that  by not rinsing the beans you don't need much other flavourings.
Let sit at least an hour before serving


Thursday, 22 November 2012

Vegan chocolate shortbread bars

I was reading the Presidents choice insiders report today, it always makes me crave all sorts of things. Since I already had supper in the crockpot, I decided to indulge my sweet tooth and bake. I have a sink load of dishes waiting to go in the dishwasher so I didn't really want to make a huge mess. I settled for something simple, quick and chocolately. This is in no way shape or form anything that resembles healthy. It is full of white flour, refined sugar and chocolate. Sometimes you have to live a little though, ;) Everything in moderation right?. I couldn't find any recipes that were vegan, so I just winged it and substituted it a bit.

Here is the original recipe "non vegan recipe" from About.com


    Here is my version:
    Vegan Chocolate chip shortbread bars

    2-1/2 cups white flour
    1/2 cup white sugar,
    1 cup Earth Balance shortening, cold and cut into cubes
    1 cup Dairy free chocolate chips,  (I used 1/2 cup Enjoy life chocolate chips, 1/2 chopped Lindt Dark chocolate)
Preheat oven to 350 degrees F. 
Place flour and sugar in large bowl. Mix with wire whisk. 
Add cut shortening. toss lightly with your hands or a fork to coat the cubes.
 Use a pastry cutter, to blend shortening into flour/sugar mixture until crumbly. 
Hand stir in the mini chocolate chips. 
Dump mixed ingredients into 9x13 pan. Press firmly with fingers and level-out.
Bake for 25 to 30 minutes or until lightly brown on top.
 Remove from oven.  Cool for 5 minutes then cut shortbread into squares, DO NOT REMOVE FROM PAN
Cool completely before serving.
Hot out of the oven!

Tuesday, 20 November 2012

Sour leaf lazy cabbage rolls

I grew up eating sour leaf cabbage rolls. I love them so much. Hand rolling cabbage rolls takes so much time. Last time I made cabbage rolls I froze the leftover filling and little bits of sour cabbage that were not suitable for rolling, I baked it like a casserole and it was so good! This time I am fine tuning the recipe to make it into lazy cabbage rolls. This recipe is sans tomatoes since that is the way my family eats sour cabbage rolls. You could use sauerkraut instead of the sour head if you like, just make sure that you use non pasteurized sauerkraut. You can fine it in the produce section or a good European deli/grocer , then stuff in jars is nothing compared to the real stuff. I really like Kissel Cabbage.  This is dairy free yet still has the richness of flavour that you expect from sour leaf cabbage rolls. This recipe makes enough for two casseroles.


Yield: 12 servings
4 cups chicken stock
2 cups water
3 cups brown Calrose rice
Sourhead Cabbage
1 Sourhead cabbage diced into 1 inch pieces or 2 bags of sauerkraut (My favourite is made by Kissel Cabbage)
3 medium onions. diced
1 package of bacon, diced into 1 inch pieces
1 tsp pepper
1 cup Dairy free margarine (I like earth balance or vegan becel)
1/4 Coconut oil (Make sure it is descented, I like Omega  Organic coconut oil for this)
1/4 cup bacon fat (I always save my fat in the freezer, so I have or for recipes like this or frying perogies. If you don't have any just add another 1/4 cup of coconut oil instead)
1/4 cup water

Bring chicken stock and water to boil in a large pot on stove, add rice lower heat to just barely simmering. Cook for 55 minutes until all  the water is absorbed.

Bacon frying

Fry bacon until crispy, remove bacon (Leave the grease in the pan)


Add onions to pan, fry until just starting to turn translucent,
Turn heat down, add margarine, coconut oil, additional bacon fat and pepper to pan, cover, simmer for 15 min.
Place diced cabbage. bacon and cooked rice in a large bowl mix well,
Put rice mixture in two greased casserole dishes
Ladle onion mixture over top, add 1/8 of a cup of water to each casserole dish
Cook covered at 350F 45 minutues OR freeze.

To make from frozen, Thaw the casserole, then cook at 350 until the internal temp is 165.
Casseroles ready for the oven/ freezer


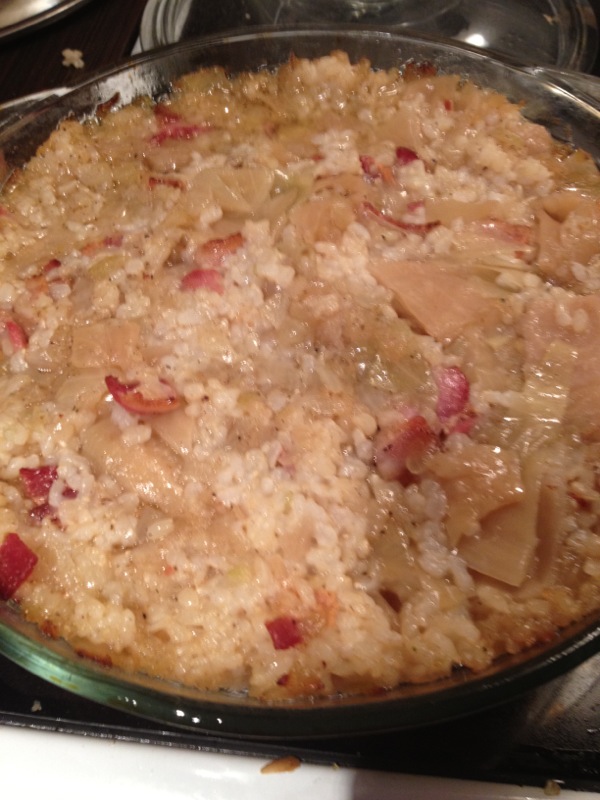
Cooked and ready to eat :)

Thursday, 8 November 2012

Mini Pumpkin bread with chocolate chips

Like I said last week I love pumpkin bread. Actually I love almost every baked good there is. I've been thinking about making some pumpkin bread since last week. Time just hadn't allowed me to do so, finally I got a chance today and seized it! I'm fairly confident when it comes to making cooking recipes up from scratch, baking is another story. I usually will alter a recipe but I have had my fair share of hockey puck blobs so I don't venture off to creating my own baking recipes. I googled for a vegan pumpkin bread recipe and found one that looked great at the "Happy Herbivore."  I have a thing about chocolate chips and baking, I like to add them to just about everything I make (Enjoy life makes awesome dairy free chocolate chips and chunks)  Since I was adding chocolate chips I needed to adjust the sugar down. I also like have extra of baking to freeze. I recently bought some mini loaf pans from Epicure and love them! 4 of them equal one large loaf, they  make loaves  the perfect size to freeze and look so cute! When using them I have to adjust the baking time since they are smaller.
What is your favourite baked good?


So without further ado here is the altered recipe:


 Mini Pumpkin bread with chocolate chips (Original unaltered recipe here)


  • ¼ cup plant-based milk (I used coconut)
  • ¼ tsp lemon juice
  • 2 cups pumpkin puree
  • 1/2 cup brown sugar
  • 2 tbsp Maple syrup
  • 1 tsp vanilla extract
  • 2 tbsp Epicure Pumpkin pie spice
  • 2 cups whole wheat flour
  • 1 tsp baking soda
  • ½ tsp baking powder
  • 1/4 cup dairy free chocolate chips


Preheat oven to 350F. 
Grease or spray a standard bread pan. 
Whisk non-dairy milk and lemon juice together until bubbly and set aside. 
In a medium mixing bowl, cream pumpkin, sugar, syrup and extract together.
In a large bowl, whisk pumpkin pie spice, flour, baking soda, chocolate chips and baking powder together. 
Pour wet mixture into dry mixture and stir until just combined. 
Pour into bread pans (I used silicone mini loaf pans), using a spatula to evenly distribute and smooth out the top. Grab a large piece of aluminum foil and make a tent over the pan. 
Bake for 1 hour for one large loaf or 30 minutes for 4 mini loaves, To test doneness insert a toothpick in the center, when the it comes out clean it is done. 
Once the bread has cooled but is still slightly warm, gently remove it from the pan and on to a serving plate.
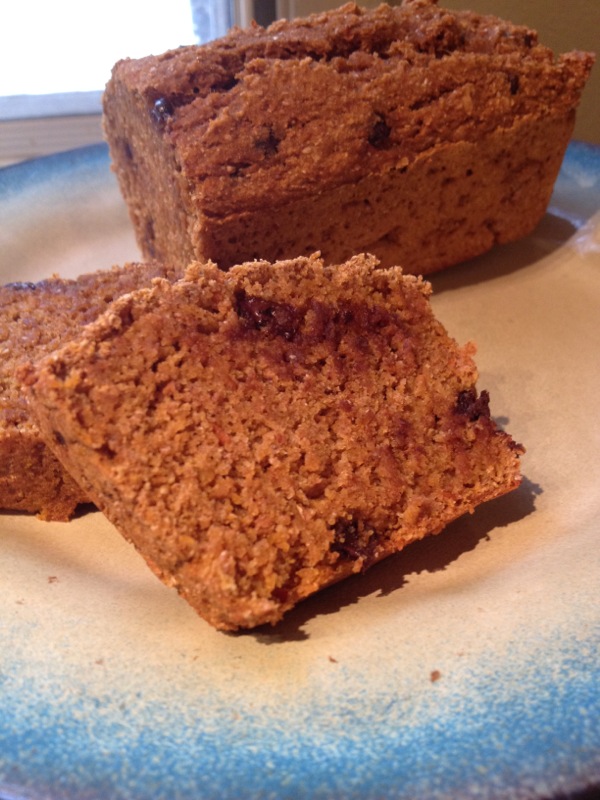
Four mini loaves cooling

Wednesday, 7 November 2012

Easy crockpot tortilla soup

I love Tortilla soup, it is filling and so delicious. It  really hits the spots after a long day canning. It is also really easy to toss in the crockpot. Clay and Orion loved it as well, they enjoy just about any soup I make.


3 cups cooked black beans (I used my recipe for Pinto beans and just used black beans instead, just remember to watch them to see if they need more water)
1 cup of corn
1 litre Chicken or vegetable broth
1 minced jalapeno
1 onion, diced
1 diced bell pepper
1 can organic tomato sauce
1 tbsp garlic powder
4 tbsp lime juice

Chili powder to taste, I used chipotle chili powder, I didn't measure. The amount will really depend on your families taste buds, I just taste the broth and added enough to make it just spicy enough.

Toppings:
Corn tortilla chips or fried tortilla strips
Chopped cilantro
Avocados, sliced

Put everything in the crockpot except for the toppings, cook on high for 5 hours or on low for around 8. I usually wait until about an hour before serving to put the bell pepper in, I don't like them mushy. Serve with fried tortilla strips on top and cilantro and sliced avocados.


Monday, 29 October 2012

Cooking Pinto Beans in a rice cooker

I will be making Mexican turkey lasagna for dinner tonight. One of the key elements of it is beans. When I have time I like to skip the tinned beans and make them from dried beans.  Some benefits of making your own are; the salt content can be lowered, I know exactly what is in them, they are much cheaper, last but not least they just taste better :) I just love the look of dried pinto beans, they are such a pretty bean.

Beans are such a versatile food, what is your favourite way to use beans?


Before you start anything else, wash your beans, dig through them and pick out any items that do not belong.
Next you need to soak your beans

You can either soak them overnight or do the quick soak method. To soak overnight you take your beans, put them in a bowl cover them with 3 parts water 1 part beans, cover and leave them for 12 hours.


I have a habit of never remembering to soak my beans overnight so I do the quick soak method.Take your beans put them in a pot, pour in the water for soaking. Bring to a boil, boil for 3 minutes. Turn off burner, let beans soak for one hour.
Beans should be nicely plumped by now, strain and RINSE well. (I find that if I forget to rinse, the beans are more gas causing)

Beans after the quick soak method, look how nice and plump they are!
Rinsed beans ready for the Rice Cooker!


 Place in rice cooker with water for cooking, garlic and onion powder, Stir.
Beans ready to be cooked


Turn rice cooker to "Cook" (this is important, I have forgotten to flip the switch from warm to cook, you end up with well soaked crunchy beans when you are ready to eat ;) )


Keep an eye on it stirring occasionally add more water if needed.

Cook until beans are soft, the time really depends on how fresh your dried beans are. My beans are fairly fresh and usually take about 45min- 1 1/2 hours.
They are done when they are soft all the way through, with no crunch. I always eat one to check. Add Salt, Pepper and Chipotle chili powder to taste.
Cooked Pinto Beans Ready to eat or use in your recipes.


Rice Cooker Pinto Beans
Yield: 2 cups cooked pinto beans
3/4 cup pinto beans
3 cup water for soaking
1 tsp garlic powder
1 tsp Onion Powder
3 cups water for cooking
Salt and pepper to taste
Chipotle Chili powder to taste

Wash and sort your beans.

1) Take your beans put them in a pot, pour in the water for soaking. Bring to a boil, boil for 3 minutes. Turn off burner, let beans soak for one hour.


2) Beans should be nicely plumped by now, strain and RINSE well. (I find that if I forget to rinse, the beans are more gas causing)

3) Place in rice cooker with water for cooking, garlic and onion powder, Stir.

4) Turn rice cooker to "Cook" (this is important, I have forgotten to flip the switch from warm to cook)

5) Keep an on it stirring occasionally add more water if needed.

6) Cook until beans are soft, the time really depends on how fresh your dried beans are. My beans are fairly fresh and usually take about 45min- 1 1/2 hours.
They are done when they are soft all the way through, with no crunch. I always eat one to check. Add Salt, Pepper and Chipotle chili powder to taste.

Alternate: You can add the salt in step 3, I don't because I have  a tendency to over salt this way. I have found that adding salt when they are cooking does not make them tough.